Change Which Testimonials Display First on your Website - Favorites
When using a widget to display testimonials on your website, you can choose to feature up to two testimonials at the top of your list. If you don’t select favorites, testimonials will display in order of the most recent testimonials by default.
Steps to Select Favorite Testimonials
Step 1:
From the Dashboard, click on Testimonials in the left-hand navigation bar, then select Manage Testimonials.
From the Dashboard, click on Testimonials in the left-hand navigation bar, then select Manage Testimonials.
Step 2:
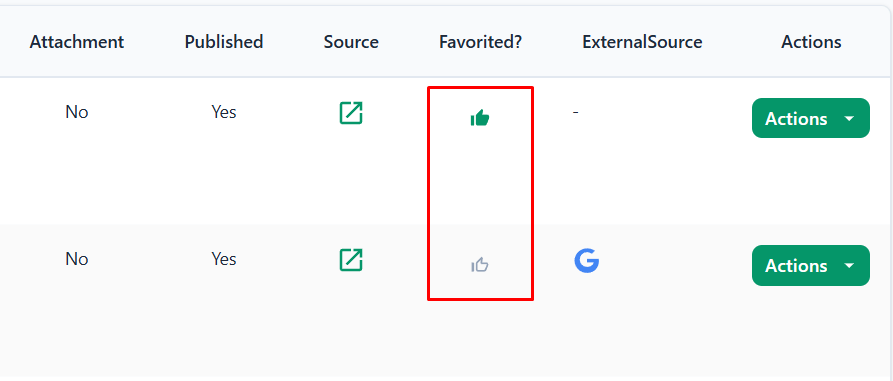
On the Manage Testimonials page, locate the Favorited? column.
- Click the thumbs-up icon to mark a testimonial as a favorite.
- A green thumbs-up indicates that the testimonial is marked as a favorite.
- An outlined thumbs-up indicates that the testimonial is not favorited.
Favorited testimonials will automatically appear at the top of your widget display.
Notes
- You can select up to two favorites at a time.
- If no testimonials are favorited, the widget will default to showing the most recent testimonials first.
- This feature may not be available in all account types or depending on the account’s settings.
Disclaimer: The procedures and screenshots provided are for reference only. Actual steps and visuals may differ slightly based on software updates, device configurations, or user settings.
Related Articles
Booj Websites: Add Testimonial Tree Reviews to Your RE/MAX Website
This article will walk you though how to add your Testimonial Tree reviews to your RE/MAX Booj Website. Step 1: Your Testimonial Tree account must have been created or acquired in RE/MAX Marketplace Be sure to login to Testimonial Tree via the ...Edit a Widget
Once you've created a widget, you will have the option of changing a number of different settings particular to that widget. Note: Depending on your parent account’s permission settings, you may not have access to this feature. Step 1: From your ...Union Street Media: Integration
Testimonial Tree - Union Street Media websites partner integration publishes testimonials and third-party reviews on your real estate brokerage's website, offices and agent profiles, and agent websites. Your Testimonial Tree Customer Success team ...Create a Widget
Widgets allow you to display testimonials on your website. This article will walk you through setting up a widget. Note: Depending on your parent account’s permissions, you may not have access to this feature. Step 1: From the Dashboard, select ...Change / Reset Your Password
Option 1: Change Password from Your Dashboard Step 1: From your Dashboard, click on your headshot in the upper right-hand corner, then select Account. Step 2: On the right-hand side under Action Items, select Change Password. Step 3: Fill in the form ...